
Appearance
Lesson media
A course can have one welcome video and one piece of media per lesson. For each, you can upload a file from your computer or embed a video from YouTube, Vimeo, Loom, or a CloudFront URL — and set a cover image that shows before it plays. Lessons also accept audio instead of video, for anything that doesn't need a picture. This page walks through all of it, what to do when an upload goes wrong, and how to think about storage.
Quick answer
Open Course content in the course editor and click the welcome page or a lesson. Drop a file onto the media control, or paste a YouTube, Vimeo, Loom, or CloudFront MP4 link. Add a cover image if you want a specific thumbnail. You can keep editing while an upload runs, and everything autosaves.
Audio is lesson-only
A lesson takes video or audio. The course welcome slot is video or embed only.
Upload or embed
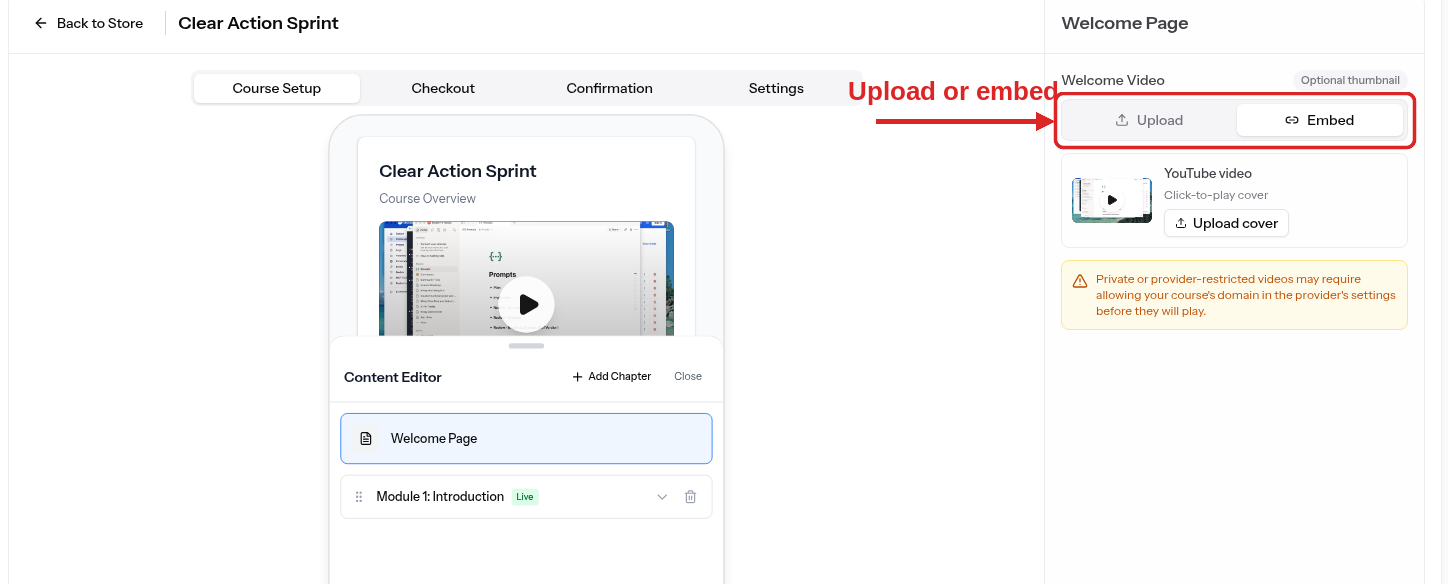
Each video slot gives you two ways to add a video:
- Upload — choose a file from your computer (MP4, MOV, or WebM). Klixey hosts it, streams it only to enrolled students, and counts it toward your storage.
- Embed — paste a link from YouTube, Vimeo, Loom, or a direct CloudFront MP4 URL. The video keeps living wherever it's hosted, plays inside the lesson, and doesn't count toward your storage.
Switch between them with the Upload / Embed control in the lesson editor. Only YouTube, Vimeo, Loom links, and CloudFront MP4 URLs work for embeds — a direct file link from anywhere else, or another site's URL, won't be accepted, so upload the file instead.
CloudFront URLs must be stable and public
If you embed a CloudFront link, it needs to be a permanent public MP4 URL. Signed or temporary CloudFront URLs (the kind that expire) aren't accepted, since they'd eventually break for your students.
Embedded videos follow the platform's privacy
An embedded video is only as private as you've set it on YouTube, Vimeo, or Loom. See Privacy and sharing below.
The welcome video
The welcome video plays on the course welcome screen — the first thing students see when they open the course, before they start any lesson. It's optional, but it's the place to set the tone:
- Greet your students by name (or by cohort).
- Tell them what the course covers and how to get the most out of it.
- Set expectations — pace, time commitment, how to ask questions.
Keep it short. Two to four minutes is plenty. The goal is "you've arrived, here's how this works," not a re-teach of the curriculum.
To add the welcome video, open Course content in the course editor and click the welcome page item at the top of the outline. The editor shows the Upload / Embed control — upload a file or paste a YouTube, Vimeo, or Loom link.
Lesson videos
Each lesson can have one video or one audio file. Click the lesson in the preview, then use the media control in the lesson editor.
Most lessons are video-led — students watch, then read any text content under the player as a recap or reference. But text-only lessons work fine too. Skip the upload if a lesson doesn't need one.
What the upload itself looks like
- Click the media control in the welcome page or lesson editor, or drop a file onto it.
- Pick a video file from your computer.
- Klixey uploads it directly from your browser. A progress bar fills as it goes.
- When it's done, the player appears in the editor and in the preview.
You can keep editing other things while an upload runs — adding lessons, writing text, switching to other modules. The upload continues in the background as long as you stay on the page.
Don't close the tab mid-upload
The upload runs in your browser. If you close the tab or navigate away before it finishes, the upload stops and you'll need to start it over. Wait for the progress bar to reach 100% before you move on.
Replacing a video
To swap a video for a new one, open the welcome page or lesson, click the upload control again, and pick the new file. Klixey replaces the existing video with the new one and the old file is cleaned up for you — you don't need to delete it separately.
This works the same way for the welcome video and for any lesson video. To switch an uploaded video to an embed (or back), use the Upload / Embed control and pick the other option.
Cover image
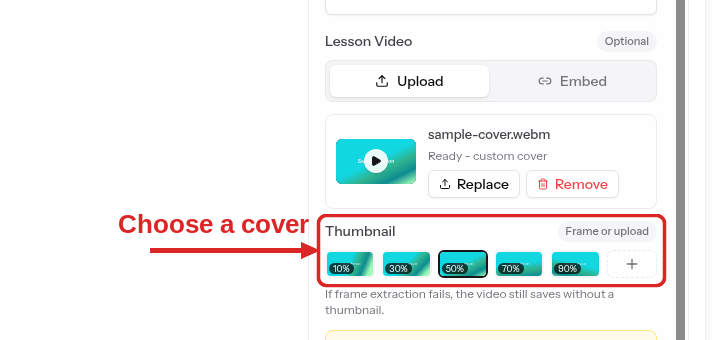
The cover image is the still that shows before a video plays — a click-to-play thumbnail on the welcome screen and in the lesson.
- For an uploaded video, pick a frame from the video or upload your own image.
- For an embedded video (YouTube, Vimeo, Loom, or CloudFront), upload your own image as the cover.
Upload your own image by clicking the cover picker or by dragging an image straight onto it — either way, Klixey resizes it for you. Use a JPG, PNG, or WebP, ideally around 1280×720. If you don't set one, the player falls back to the video's own first frame (uploads) or the provider's thumbnail (embeds). A clear cover — a title card or a strong frame — earns more plays than a random freeze-frame.
To change your mind, Replace swaps in a new cover and Remove clears it back to the default.
Audio lessons
Not every lesson needs a picture. An interview, a meditation, a recap, a podcast-style module — these work better as audio, and students can listen while doing something else.
Upload an audio file to a lesson exactly the way you'd upload a video: drop it onto the media control. Klixey detects it's audio and gives students a waveform player instead of a black video frame.
| Format | File extension |
|---|---|
| MP3 | .mp3 |
| M4A | .m4a |
| AAC | .aac |
| WAV | .wav |
WAV files are large — several times the size of the same recording as MP3 — and count against your storage accordingly. Export to MP3 unless you have a reason not to.
Audio uploads behave like video in every other respect: they're hosted by Klixey, streamed only to enrolled students, counted toward your storage, and covered by the same cover-image control. A cover is worth setting on an audio lesson, since there's no first frame to fall back on.
To switch a lesson from video to audio (or back), upload the other kind of file. The previous one is replaced and cleaned up for you.
Downloadable files go somewhere else
Worksheets, slides, and templates aren't lesson media — attach them as lesson resources instead.
Supported video formats
When you upload a file, Klixey accepts:
| Format | File extension | Notes |
|---|---|---|
| MP4 | .mp4 | The most common. Almost every phone, camera, and editing tool produces MP4 by default. |
| MOV | .mov | Apple's format. Native iPhone recordings are usually MOV. |
| WebM | .webm | Less common, but supported. |
If your video is in a different format (AVI, MKV, WMV, FLV, and so on), convert it before uploading. Free tools like HandBrake export to MP4 from almost anything.
Embedding from YouTube, Vimeo, or Loom sidesteps formats entirely — whatever plays there plays in your lesson. A CloudFront embed is the one exception: it still has to be a direct MP4 URL.
Storage
Every video and audio file you upload counts toward your workspace storage limit. The exact cap depends on your plan — see Plans for the breakdown. Embedded videos — YouTube, Vimeo, Loom, or a CloudFront URL — don't count; they stay wherever they're hosted.
A storage indicator lives on your workspace settings page and shows you:
- How much you've used.
- How much is left.
- Your plan's total.
If a new upload would push you past your cap, Klixey blocks it before the upload starts and tells you so — you don't waste time waiting for a 1 GB file to finish only to find out there was no room. The message tells you how much you're trying to add and how much room you have.
When that happens, your options are:
- Free up space — delete old or unused videos.
- Use shorter or smaller videos — re-export at a lower bitrate.
- Upgrade your plan — higher tiers give you more storage.
See Storage usage for the full guide, and Storage and file limits for per-file caps.
Storage during uploads
Klixey reserves a little headroom for the upload while it runs, so two large uploads at once can't accidentally push you past your limit. That headroom is released automatically when the upload finishes or if it's abandoned.
When an upload fails
Most upload failures are network blips — Wi-Fi dropped, the laptop went to sleep, the browser tab lost focus for too long. The usual fix:
- Click Upload video again.
- Pick the same file.
- Watch it through this time.
If it fails repeatedly with the same file, a few things to check:
- File size. Each video has a per-file cap (see Storage and file limits). Files past the cap are rejected before the upload starts — you'll see a clear message.
- File format. If your file isn't MP4, MOV, or WebM, convert and retry.
- Connection stability. Large files are sensitive to flaky Wi-Fi. Wired or stable LTE works better than a weak hotel signal.
- Browser. Try a fresh tab in Chrome, Safari, or Firefox. Very old browsers can fail mid-upload on big files.
If you've worked through that list and the upload still won't finish, see Troubleshooting or contact support.
Privacy and sharing
Uploaded videos are private to your store. Klixey streams them only to customers who are signed in to the customer portal and enrolled in the course, and the player on a student's lesson page isn't a public URL you can paste anywhere.
Embedded videos follow the privacy you set on the platform they live on. A YouTube video marked Public can still be found on YouTube; set it to Unlisted (or use Vimeo's or Loom's privacy controls) if you only want enrolled students to reach it. Embedding a video in a lesson doesn't make a public video private — the privacy stays with the video on YouTube, Vimeo, or Loom.
A CloudFront embed works the same way in spirit: it has to be a public URL (see the note above), so treat it as public and control access at the CloudFront distribution if you need to restrict it.
Tips that pay off later
- Get the audio right. Students forgive shaky video; they don't forgive bad sound. A cheap lavalier mic is the single biggest upgrade.
- Bake captions into the source file when you can. Klixey shows whatever's in the file — captions you add in your editing tool show up in the player.
- Keep individual lessons under 15 minutes. Long lessons get abandoned mid-watch. Split a 40-minute video into three lessons and completion rates climb.
- Re-export at sensible bitrates. A 1080p MP4 at 8 Mbps looks great and uploads fast. Pushing 4K at 50 Mbps eats your storage without helping students.
Related
- Building a course — modules, lessons, and the editor.
- Lesson resources — downloadable files attached to a lesson.
- Storage usage — what counts toward your quota and how to free space.
- Storage and file limits — per-file caps and supported formats.
- Plans — storage by tier.